This GSEB Class 7 Maths Notes Chapter 10 Practical Geometry covers all the important topics and concepts as mentioned in the chapter.
Practical Geometry Class 7 GSEB Notes
You are familiar with a number of shapes. You learnt to draw some of them in the earlier classes. For example, you can draw a line segment of given length, a line perpendicular to a given line segment, an angle, an angle bisector, a circle etc.
Now you will learn to draw parallel lines and some types of triangles.
1. Construction of a line parallel to a given line ‘l’ through a point ‘A’ not on the line using ruler and compasses only. To construct a line parallel to a given line through a point not lying on the line ; we make use of any one of the properties regarding the transversal and parallel lines.
Let us recall these properties :
If a transversal cuts two parallel lines, then
- Alternate angles are equal.
- Corresponding angles are equal.
- Sum of interior angles on the same side of a transversal is 180°.
Let us draw a line m parallel to Z through a point A not lying on Z. Steps of construction are as follows :
Step 1. Take a line ‘Z’ and a point ‘A’ outside ‘l’ [Figure].

Step 2. Take any point B on Z and join B to
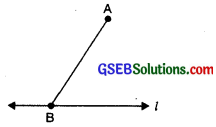
Step 3. With B as centre and a convenient radius, draw an arc cutting Z at C and BA at D [Figure].
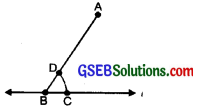
Step 4. Now with A as centre and the same radius as in step 3, draw an arc EF cutting AB
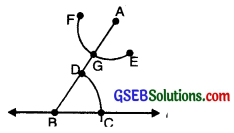
Step 5. Place the pointed tip of the compasses at C and adjust the opening so that the pencil tip is at D [Figure].
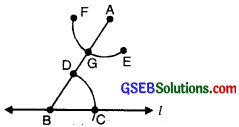
Step 6. With the same opening as in step 5 and with G as centre, draw an arc cutting the arc EF at H. [Figure].
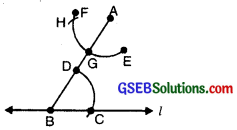
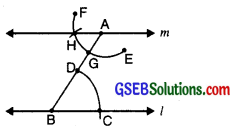
Step 7. Now join AH to draw a line ‘m’ [Figure)].
Note that ∠ABC and ∠BAH are alternate interior angles.
∴ m ∥ l
![]()
Construction of Triangles
We know that triangles are classified on the basis of sides or angles.
The following important properties concerning triangles are :
- The exterior angle of a triangle is equal in measure to the sum of interior opposite angles.
- The total measure of the three angles of a triangle is 180°.
- Sum of the lengths of any two sides of a triangle is greater than the length of the third side.
- In any right-angled triangle, the square of the length of hypotenuse = the sum of the squares of the length of the other two sides.
In the chapter on “Congruence of Triangles”, we have learnt that a triangle can be drawn if any one of the following sets of measurements are given :
- Three sides.
- Two sides and the angle between them.
- Two angles and the side between them.
We will now attempt to use these ideas to construct triangles. To construct a triangle with given measures, we should first draw a rough sketch and indicate the given measures.
This will help us to understand the steps to be followed in the construction of a triangle.
1. Construction of a triangle when the lengths of its three sides are known (SSS criterion).
Example:
Construct AABC in which AB = 3i cm, BC = 5 cm and CA = 7 cm.
Answer:
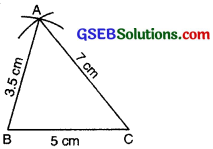
Given: Three sides of a triangle as AB = 3.5 cm, BC = 5 cm and CA = 7 cm.
To construct: A triangle with these three sides.
Step 1: We first draw a rough sketch of the triangle ABC and indicate the lengths of the three sides.
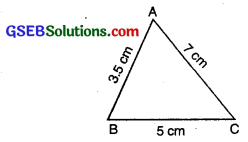
Step 2: Draw a line segment BC = 5 cm.
![]()
Step 3: From B; point A is at a distance 3.5 cm. So, with B as centre, draw an arc of radius 3.5 cm (Now point A will be some where on this arc. Our job is to find where exactly A is.)
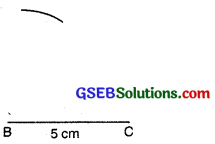
Step 4: From C, point A is at a distance of 7 cm. So, with C as centre; draw an arc of radius 7 cm. (A will be some where on this arc. We have to fix it).
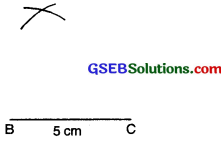
Step 5: A has to be on both the arcs drawn. So it is the point of intersection of arcs.
Mark the point of intersection of arcs as A. Join AB and AC.
Thus we obtain AABC.
 im-12
im-12
2. Construction of a triangle when the lengths of two sides and the measure of angle between them are known. (SAS criterion)
Example:
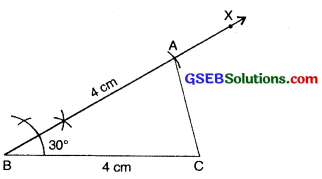
Construct AABC such that AB = 4 cm, Z.B = 30° BC = 4 cm. Also name the type of triangle on the basis of sides.
Answer:
Given: Two sides of AABC as AB = 4 cm, BC = 4 cm and Z:B = 30°. To construct: A triangle with these’ two sides and included angle.
Step of Construction :
Step 1: We first draw a rough sketch of the AABC and indicate the measure of these two sides and included angle.
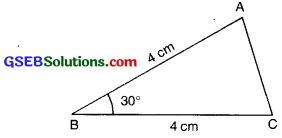
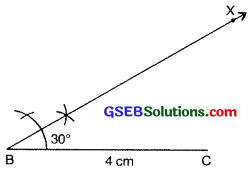
Step 2: Draw a line segment BC of length 4 cm.

Step 3: At B draw BX making an angle of 30° with BC (The point A must be somewhere on this ray of the angle).
 im-15
im-15
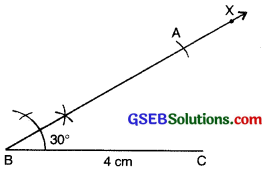
Step 4: (To fix A. the distance AB has been given) With 13 as centre, draw an arc of radius 3 cm. It cuts BX at the point A.
Step 5: Join AC.
![]()
3. Constructing a triangle when the measure of two of its angles and the length of the side included between them is given (ASA criterion).
Example:
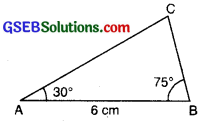
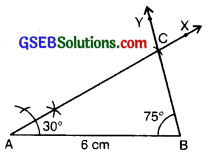
Construct AABC, given AB = 6 cm, LA = 30° and ZB = 75°.
Answer:
Given: One side of AABC as AB = 6 cm, mLA = 30° and mZB = 75°.
To construct: A triangle with one side and these two angles.
Steps of Construction :
Step 1: We first draw a rough sketch of ∆ABC and indicate the measures of side and two angles.
Step 2: Draw a ray AB of length 6 cm.

Step 3: At A; draw a ray AX making an angle 30° with AB.
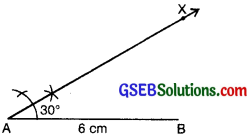
Step 4: With the help of compass. At B; draw a ray BY making an angle of 75° with AB.
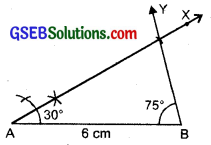
Step 5: Both rays AX and BY intersect, at a point. So the point of intersection of the two rays is C Then. AABC is now obtained.
4. Constructing a right-angled triangle when the length of a side and its hypotenuse are given (RHS Criterion)
Example:
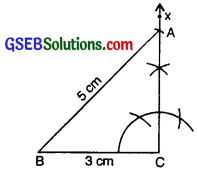
Construct a right angled triangle ABC with ZC = 90°, AB = 5 cm and BC = 3 cm.
Answer:
Given: Two sides of AABC as AB = 5 cm,
BC = 3 cm
and ∠C = 90°.
To construct: A triangle with these two sides and one right angle.
Steps of Construction :
Step 1: We first draw a rough sketch of the triangle ABC and indicate the measure of these two sides and mark the right angle.
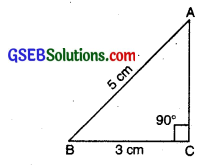
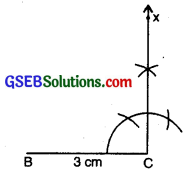
Step 2: Draw BC of length 3 cm.
 im-24
im-24
Step 3: At C, draw CX ± BC. (A should be somewhere on this perpendicular).
Step 4: With B as centre, draw an arc of radius 5 cm. (A must be on this arc since it is at a distance of 5 cm from B).
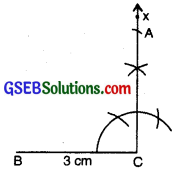
Step 5: A has to be on the perpendicular line CX as well as on the arc drawn with centre C. A is the meeting point of these two. AABC is now obtained.
