This GSEB Class 6 Maths Notes Chapter 5 Understanding Elementary Shapes covers all the important topics and concepts as mentioned in the chapter.
Understanding Elementary Shapes Class 6 GSEB Notes
Introduction:
All the shapes we see around us are formed using lines or curve. We can see corners, edges, planes, open curves and closed curves in our surroundings. We find that they have different sizes and measurement. Let us now try to develop tools to compare their sizes.
Line Segment:
The part of a Line having two end points A and B and containing all the points in between is called a Line Segment AB. It is denoted by AB.
![]()
![]()
Comparison of Line Segments:
By comparison of two line segments we mean a (order) relation between their lengths, that is, which of them is longer or shorter.
Method 1:
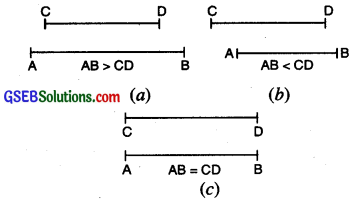
Comparison by Observation Suppose we are given two line segments AB and CD. Just by observing line segments carefully we tell which is longer and which is shorter.
(a) If AB is longer than CD, we write AB >CD.
(b) If AB is shorter than CD, we write AB < CD.
(c) If both the line segments are equal, then
we write AB = CD. See fig. below :
The observation method is not always suitable for comparison of two or more line segments. Its drawback is that when two segments are equal or nearly equal it becomes difficult for the eye to differentiate if they are shorter or longer or equal. Hence we have to employ more accurate methods.
Method 2.
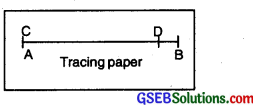
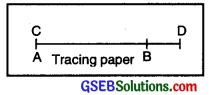
Comparison by Tracing Suppose we want to compare two segments AB and CD. We take a tracing paper and place it on the segment CD. We trace the segment on the tracing paper with a ruler and a pencil.

Now, we take this copy of the segment CD and place it on the segment AB so that C is placed on A and segment CD along segment AB.
There are three possibilities of point D on line AB :
1. D is between A and B [Fig. (i)]. We say that segment CD is shorter than segment AB and we write CD < AB.
2. D is just on B [Fig. (ii)]. We say that segment CD is equal to segment AB and we write CD – AB.
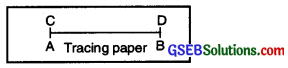
Note: Two line segments having the same length are said to be equal.
3. D is beyond B [Fig. (iii)]. We say that segment CD is longer than segment AB and write CD > AB.
Method 3:
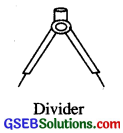
Comparison by a Divider
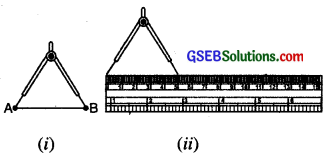
A divider is an instrument in the geometrical set whose picture is as shown in the figure. The divider has two arms that are hinged together. The arms have pointed metals ends. The distance between the ends can be changed or adjusted Divider by opening out or closing in the arms.
Example. Suppose we are given two line segments AB and CD. We want to compare AB and CD.
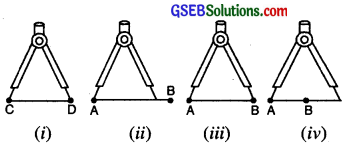
We place the end-point of one arm of the divider on C and open the arms carefully so that the end-point of the other arm is D [Fig.]
(i) Now we lift the divider and without disturbing its opening, place the end-point of one arm on A and the end-point of the other arm on segment AB. If the end-point of second arm falls
- between A and B, then CD < AB [Fig. (ii)l
- on B, then CD = AB [Fig. (iii)]
- beyond B, then CD > AB [Fig. (iv)J.
![]()
Measurement of Line Segment
Method 1:
Measuring by Ruler
To measure line segments, we use a scale that has centimetre marks on one edge and inch marks on the other edge.
To measure AB, keep the ruler in such a way that point A of the line segment coin¬cides with ‘o’ mark of the ruler. Then read the mark on the ruler against point B.
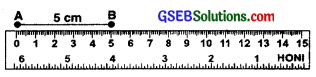
Hence, the length of line segment AB = 5 cm.
Method 2:
Measuring by both Ruler and Divider
Let us use the divider to measure length of AB.
- Open the divider. Place the end point of one of its arms at A and the end point of the second arm at B.
- Taking care that opening of the divider is not disturbed, lift the divider and place it on the ruler. Ensure that one end point is at the zero mark of the ruler.
- Now read the mark against the other end point. It is 5 cm. Thus length AB = 5 cm.
Measuring Angles
Angle:
An angle is a figure formed by two rays with the same initial point.
The common initial point is called the vertex of the angle and the rays forming the angle are called its arms (or sides).
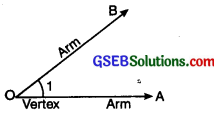
In the Fig., O is the vertex and rays \(\overrightarrow{\mathrm{OA}}\) and \(\overrightarrow{\mathrm{OB}}\) are the arms of the angle.
The angle shown is denoted by∠1 or ∠0 or ∠AOB or ∠BOA.
Remark: Two line segments with a common end-point also determine as angle at that point.
Degree Measure of Angles:
It is the degree measure of angle which lies between 0 and 180 and is known as a measure in degree.
Measuring a given angle:
Suppose we want to measure ZABC. The following steps should be followed :
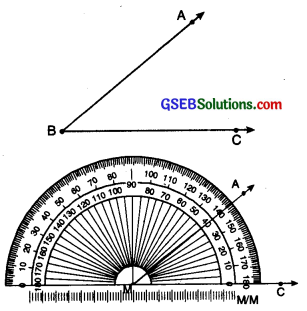
- Place the protractor so that the mid point M of its straight edge lies on the vertex B of the angle.
- Adjust the protractor so that BC is along the straight edge of the protractor.
- Read the scale on the protractor which has the 0° mark coinciding with the straight edge.
- The mark shown by \(\overrightarrow{\mathrm{BA}}\) on the curved edge gives the degree measure of an angle we write m ∠ABC = 40°.
Types of Angles
1. Straight Angle:
An angle formed by two opposite rays is called a straight angle.
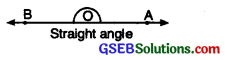
Measure of straight angle = 180° – 2 right angles. Two right angles make one straight line.
2. Complete Angle:
If a rotating ray, after making a complete revolution, coincides with the initial position, the angle formed is called a complete angle.
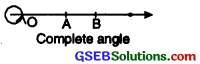
Measure of a complete angle = 360°
= 4 right angles,
3. Zero Angle:
If the initial and the final positions of a ray coincide without making any revolution, we say that the angle formed is a zero angle.
![]()
Measure of Zero angle = 0°
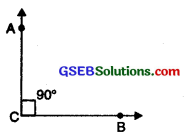
4. Right Angle:
An angle whose measure is 90°, is called a right angle. Two lines that meet at a right angle are said to be perpendicular. It is also written as AO⊥OB. ‘⊥’ is the symbol of perpendicular.
5. Acute Angle:
An angle which is greater than a zero angle but less than a right angle is called acute angle. Its measure is greater than 0° and less than 90°.
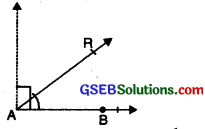
6. Obtuse Angle:
An angle which is greater than a right angle but less than a straight angle is called an obtuse angle. Its measure is greater than 90° but less than 180°.
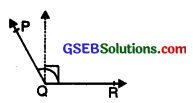
7. Reflex Angle:
An angle whose measure is greater than 180° but less than 360° is called a reflex angle.
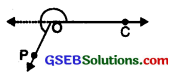
![]()
Perpendicular Lines:
Two lines are said to be perpendicular if the angle between them is a right angle. If a line CD is perpendicular to AB then we write CD ⊥ AB. The symbol for a perpendicular line is ‘⊥’
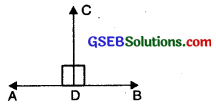
Perpendicular Bisector of a Line
The perpendicular bisector of a line crosses it half way along its length and form a right angle with it.
Let AB be a line segment. Mark its mid point as M. Let CD is a line perpendicular to AB through M.
Then CD is called perpendicular bisector of line segment AB.
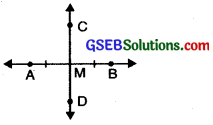
As in above figure CM ⊥ AB and CM bisects AB.
Classification of Triangles
On the basis of Sides
A: Types of Triangles by considering the lengths of sides.
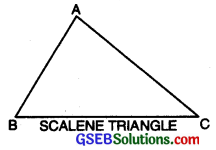
1. Scalene Triangle:
A triangle, no two of whose sides are equal, is called a scalene triangle,
∵ AB ≠ BC ≠ CA
∴ ∆ABC is a scalene triangle.
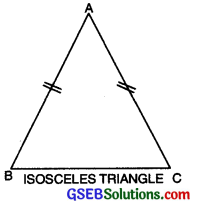
2. Isosceles Triangle
A triagle two of whose sides are equal, is called an isosceles triangle.
In triangle. ABC, side AB = side AC.
∴ ∆ABC is an isosceles triangle.
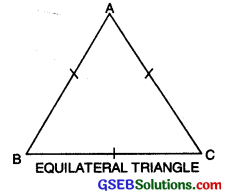
3. Equilateral Triangle
A triangle all of whose sides are equal to one another is called an equilateral triangle. In ∆ABC, AB = BC = CA.
∆ABC is an equilateral triangle.
On the basis of Angles
B. Types of Triangles by considering the measure of their angles.
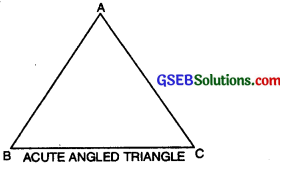
1. Acute angled Triangle or Acute Triangle:
A triangle all of whose angles are acute, is called an acute angled triangle or an acute triangle.
In ∆ABC, ∠A, ∠B, ∠C each is acute, therefore ABC is acute triangle.
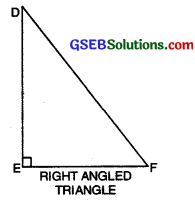
2. Right angled Triangle or Right Triangle:
A triangle, one of whose angles is a right angle, is called a right angled triangle or a right triangle.
In ∆DEF, ∠E is one right angle therefore ∆DEF is right triangle.
3. Obtuse angled Triangle or Obtuse Triangle:
A triangle one of whose angles is obtuse, is called an obtuse angled triangle or an obtuse triangle.

In ∆PQR, ∠R is obtuse angle therefore APQR is obtuse triangle.
Polygons:
A polygon is a plane figure that is made by joining the line segments. Each line segment meets exactly two other line segments. The inter section point of two lines segment is called the vertex of the polygon.
For example :
- Polygons with three sides are called triangles.
- Polygons with four sides are called quadrilateral.
- Polygons with five sides are called pentagon.
- Polygons with six sides are called hexagons and so on.
Classification of Polygons:
1. Regular Polygons:
- If all the sides and internal angles of a polygons are equal then the polygon is called a regular polygon.
- Example: Equilateral triangle, square.
2. Irregular Polygons:
- If sides and angles are not equal then it is called an irregular polygon.
- Example: Scalene triangle, rectangle etc. are example of irregular polygons.
3. Convex Polygons:
- A polygon is called a convex polygon if the measure of its each angle is less than 180°.
- In a convex polygon, the line containing any side of the polygon has the remaining vertices on the same of it. Square, rectangle, parallelogram, all triangles etc. are examples of convex polygon.
4. Concave Polygons:
- A polygon is called a concave polygon if the measure of atleast one of the angles is more than 180°.
- In a convex polygon, the line segment joining any, two points in the interior of a polygon does not lie within the polygon.
![]()
Quadrilateral:
A closed figure made of four line segments is called a quadrilateral.
In fig., ABCD is a quadrilateral.
Types of Quadrilaterals
1. Parallelogram:
A quadrilateral whose pair of opposite sides are parallel and equal is called a parallelogram. Its opposite sides are equal.
In fig. ABCD is a llgm.
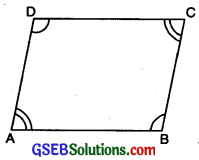
Here,
- AB ∥ CD and BC ∥ AD.
- AB = CD and BC = AD.
- ∠A = ∠C and ∠B – ∠D.
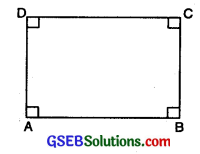
2. Rectangle:
A rectangle is a parallelogram in which all angles are right angles.
In fig., ABCD is a rectangle
Here
- AB ∥ CD and BC ∥ AD
- AB = CD and BC = AD
- ∠A = ∠B = ∠C = ∠D = 90°
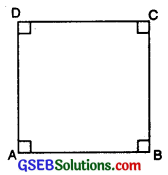
3. Square:
A square is a rectangle in which all sides are equal.
In fig., ABCD is a square
Here,
- AB ∥ CD and BC ∥ AD
- AB = BC = CD = DA
- ∠A = ∠B = ∠C = ∠D = 90°
4. Rhombus:
A Rhombus is a parallelogram whose all sides are equal, opposite sides are parallel and opposite angles are equal.
In fig., ABCD is a Rhombus
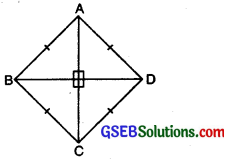
Here,
- AB = BC = CD = DA
- ∠A = ∠C and ∠B = ∠D
- AB ∥ CD and AD ∥ BC.
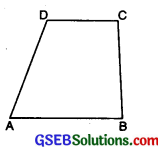
5. Trapezium:
A quadrilateral is called trapezium if a pair of opposite sides are parallel.
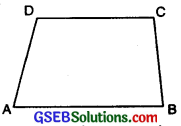
In fig., ABCD is a trapezium.
Three-dimensional Shapes:
We come across some shapes in our daily life which are solid and not a flat shapes. They occupy length, width and thickness. We call them 3-dimensional shapes or objects.
Some examples of 3 dimensional solid objects are Football, Cone, Cylinder, Cuboid, etc.
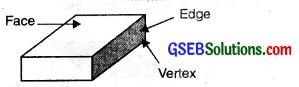
1. Cuboid:
A cuboid looks like a rectangular box. Objects such as a match box, geometry box, brick etc. book like a cuboid. A cuboid has 6 faces, 8 vertices and 12 edges.
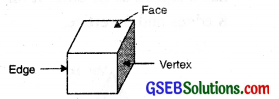
2. Cube:
A cube is a cuboid whose edges are all of equal length. Objects such as dice, sugar, cubes etc. look like a cube. It has 6 faces, 12 edges and 8 vertices.
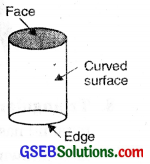
3. Cylinder:
Objects such as drum, Face circular pipes, look like a cylinder. A cylinder has 2 plane faces (top and bottom) and 1 curved face. It has 2 circular Edge edges. It has no vertex.
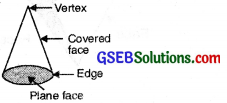
4. Cone:
Objects such as joker cap, birthday cap etc. look like a cone. A cone has 1 plane face and 1 curved face. It has 1 edge and 1 vertex.
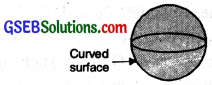
5. Sphere:
A sphere is a 3 dimensional figure. Which is made up of all points in the space which are at equal distance from a fixed point. Objects such as globe, ball, sun etc. look liked sphere. It has one curved surface, no vertex and no edge.
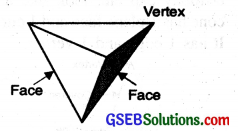
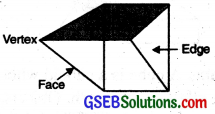
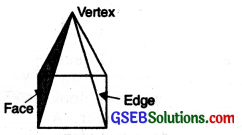
6. Triangular Prism:
A triangular prism is often the shape of a kaleidoscope. It has triangles as the faces. It has 5 faces, 9 edges and 5 vertices.
7. Square Pyramid:
A square pyramid has a square as its base. It has 5 faces, 8 edges and 5 vertices.
8. Triangular Pyramid:
A triangular pyramid has a triangle as its base. It is also known as a tetrahedron. It has 4 faces, 4 vertices and 6 edges.