Gujarat Board GSEB Textbook Solutions Class 6 Maths Chapter 14 Practical Geometry Ex 14.4 Textbook Questions and Answers.
Gujarat Board Textbook Solutions Class 6 Maths Chapter 14 Practical Geometry Ex 14.4
Question 1.
Draw any line segment \(\overline{\mathrm{AB}}\). Mark any point M on it. Through M, draw a perpendicular to \(\overline{\mathrm{AB}}\) (Use ruler and compasses)
Solution:
Steps of construction:
Step I: Draw a line segment \(\overline{\mathrm{AB}}\) and mark a point M on it.
Step II: Place the steel end of compasses at M and open it conveniently to draw an arc such that it intersects AB at P and Q.

Step III: With P and Q as centres and radius greater than PM, draw two arcs such that they intersect at C.
Step IV: Join C and M. Thus, CM ⊥ AB.
![]()
Question 2.
Draw any line segment \(\overline{\mathrm{PQ}}\). Take any point R, not on it. Through R, draw a perpendicular to \(\overline{\mathrm{PQ}}\). (Use ruler and set-square)
Solution:
Steps of construction:
Step I: Draw a line segment and take a point R outside it.

Step II: Place a set-square on \(\overline{\mathrm{XY}}\) such that one arm of its right angle aligns along with it.
Step III: Place a ruler along the edge opposite to the right-angle of the set-square.
Step IV: Hold the ruler fixed and slide the set-square along the ruler till point R touches the other arm of the set-square.
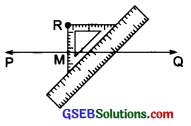
Step V: Join RM along the edge through R, meeting the line segment PQ at M.
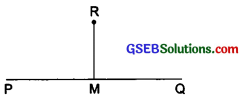
Thus, \(\overline{\mathrm{RM}}\) ⊥ PQ.
Question 3.
Draw a line l and a point X on it. Through X, draw a line segment XY perpendicular to l.
Now draw a perpendicular to XY at Y. (Use ruler and compasses)
Solution:
Steps of construction:
Step I: Draw a line l and mark a point X on it.
Step II: With X as centre and a suitable radius, draw an arc intersecting the line T at two points P and Q.
Step III: With P and Q as centres and a radius greater than PX, draw two arcs, which intersect each other at M.
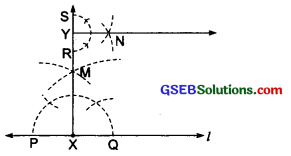
Step IV: Join XM and produce it to Y. Here, XY ⊥ l.
Step V: With Y as centre and a convenient radius, draw an arc intersecting XY at two points R and S.
Step VI: With R and S centres and a radius greater than YR, draw two arcs, which intersect each other at ‘N’.
Step VII: Join Y and N.
Thus, YN ⊥ XY at Y